
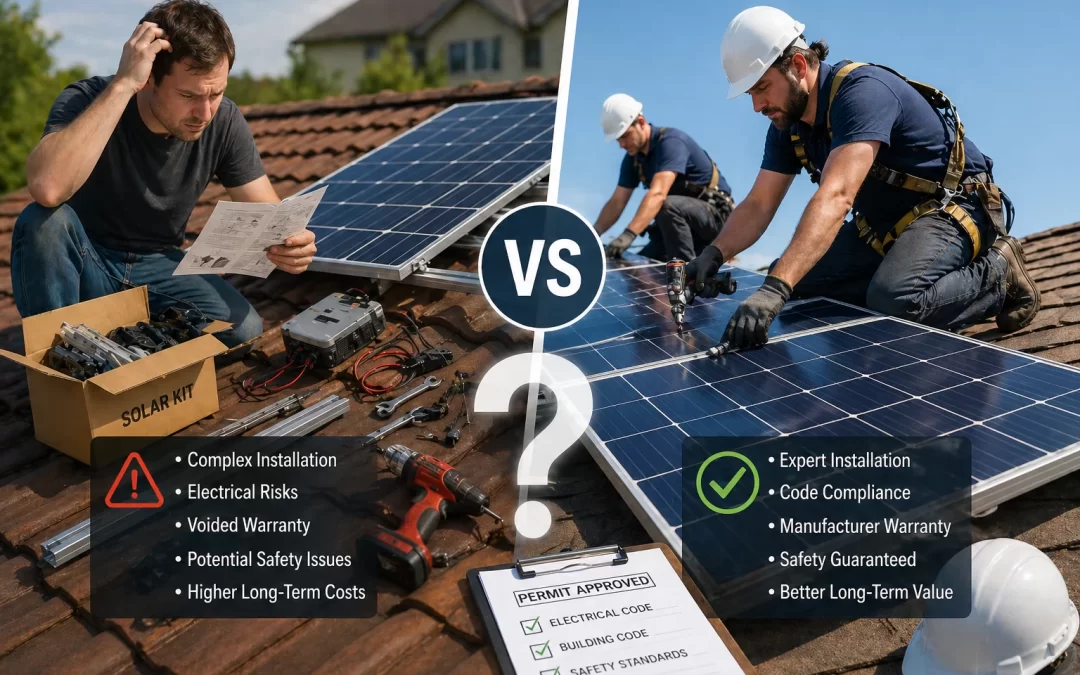
DIY solar can save on labor costs, but for most U.S. homeowners, professional installation is usually safer, more reliable, and more cost-effective over the life of the system. A typical home solar system costs $28,000–$32,000 before incentives, and mistakes with design, wiring, or permits can easily wipe out any DIY savings. DIY may make sense for small off-grid or ground-mounted projects if you’re very handy and comfortable with electrical work, but roof-mounted, grid-tied systems are usually best left to licensed installers. Always check local codes, utility rules, and your roof and electrical conditions before deciding.
Thinking about DIY solar vs. professional installation is natural when you see how much a full system costs. This guide is for U.S. homeowners who want a clear, honest look at whether doing it yourself is worth the risk. We’ll walk through costs, safety, permits, warranties, and when DIY can work — and when it’s smarter to hire a pro.
Table of Contents
- What “DIY Solar” Really Means for Homeowners
- DIY Solar vs. Professional Installation: Cost Comparison
- The Real Risks of DIY Solar Installation
- When DIY Solar Can Make Sense
- When Professional Solar Installation Is the Better Choice
- Key Numbers: Costs, Savings, and Payback
- Permits, Codes, and Utility Approval: Why DIY Gets Complicated
- Roof, Structure, and Safety Considerations
- Warranties, Insurance, and Long-Term Support
- Decision Guide: Should You DIY or Hire a Pro?
- Frequently Asked Questions
- Summary: DIY vs. Pro Solar Installation
- What to Do Next
What “DIY Solar” Really Means for Homeowners
Two very different types of DIY solar
When people say “DIY solar,” they usually mean one of two things:
- Full DIY system: You design the system, buy equipment (often as a kit), pull permits, mount the panels, run wiring, and coordinate inspections yourself.
- Partial DIY / hybrid: You do some work (like mounting panels or trenching) but hire a licensed electrician or installer for wiring, interconnection, and final sign-off.
By contrast, professional installation means a licensed solar contractor handles design, permits, installation, inspections, and utility paperwork, usually with equipment and workmanship warranties.
Grid-tied vs. off-grid DIY projects
Most U.S. homeowners are considering grid-tied solar — systems connected to the utility grid that can send excess power back and draw power at night. These are heavily regulated and must meet electrical and building codes.
Off-grid or small DIY projects (like a shed, cabin, or RV) are much simpler and often don’t involve your utility at all. DIY is far more realistic in these cases.
Why this distinction matters
- Grid-tied roof systems involve higher voltages, more complex wiring, and strict code requirements.
- Most utilities require sign-off from a licensed electrician or installer before connecting a system.
- Many panel and inverter manufacturers limit warranties if systems aren’t installed by approved professionals.
So the “DIY vs. pro” question is really: Do you want to take on design, permitting, and safety responsibility for a high-voltage electrical system on your roof?
DIY Solar vs. Professional Installation: Cost Comparison
Typical professional installation costs
For a typical U.S. home, a professionally installed grid-tied solar system usually falls in these ranges:
- System size: 6–10 kW (about 15–25 panels)
- Cost per watt: $2.50–$3.50
- Total cost before incentives: $28,000–$32,000 for many average homes
- After 30% federal tax credit (ITC): roughly $19,600–$22,400, if you qualify
These numbers are national averages; your actual quote depends on your roof, location, equipment choices, and local labor costs. For a deeper dive into how these numbers work, see the site’s solar cost and savings guide.
What DIY solar actually saves
DIY solar mainly saves on labor and overhead, not equipment. Typical breakdown for a professional system:
- Equipment (panels, inverter, racking, wiring): ~60–70% of cost
- Labor, design, permits, overhead: ~30–40% of cost
For a $30,000 system, that means:
- Equipment: ~$18,000–$21,000
- Labor/overhead: ~$9,000–$12,000
A DIY kit for the same size system might cost $1.00–$1.75 per watt, or roughly $10,000–$17,500, depending on quality and components. On paper, you might save $8,000–$15,000 by doing everything yourself.
Hidden costs that eat into DIY savings
DIY projects often run into extra costs, such as:
- Engineering or structural reports required by your city or county
- Permit fees and re-submission fees if plans are rejected
- Specialized tools (torque wrenches, crimpers, safety gear, ladders, scaffolding)
- Correcting mistakes (leaky roof penetrations, failed inspections, rewiring)
- Paying a licensed electrician for final connections or sign-off
These can easily add $1,000–$5,000+ to a DIY project, especially if you need professional help late in the process.
Financial risk vs. savings
With a professional installation, the installer is responsible for design errors, code compliance, and workmanship issues. With DIY, you absorb that risk. A single major mistake — like a roof leak that damages your home, or wiring that fails inspection multiple times — can erase the savings you hoped to gain.
The Real Risks of DIY Solar Installation
Electrical safety and fire risk
Solar systems operate at high DC voltages, often 300–600 volts or more on residential arrays. Mistakes can be serious:
- Improperly sized or routed wiring can overheat and cause fires.
- Incorrect grounding or bonding can create shock hazards.
- Poorly installed connectors can arc, melt, or fail over time.
Licensed electricians and solar installers are trained to follow the National Electrical Code (NEC) and local amendments. Most homeowners are not.
Roof damage and leaks
Every roof penetration is a potential leak if not done correctly. Common DIY issues include:
- Missing or incorrect flashing around mounts
- Bolts not anchored into rafters or trusses
- Over- or under-tightening lag bolts, damaging shingles or tiles
- Using incompatible sealants that fail in heat or UV
Roof leaks may not show up for months or years, and repairs can be expensive — especially if water damage spreads inside your home. If you’re unsure about your roof’s condition, it’s worth reviewing whether you need a new roof before installing solar.
Code compliance and failed inspections
DIY systems must still pass building and electrical inspections. Common failure points include:
- Incorrect wire sizing or overcurrent protection (breakers/fuses)
- Improper labeling of disconnects and equipment
- Non-compliant roof setbacks or pathways for firefighters
- Racking not installed to manufacturer specs or structural requirements
Each failed inspection can mean delays, rework, and additional costs. In some areas, inspectors are especially strict with homeowner-installed systems.
Utility interconnection and PTO delays
To turn on a grid-tied system, you need Permission to Operate (PTO) from your utility. Utilities often require:
- Stamped electrical drawings
- Proof of code-compliant installation
- Sign-off from a licensed electrician or contractor
If paperwork is incomplete or your system doesn’t meet requirements, PTO can be delayed for months. For more on this process, see the guide on what Permission to Operate is and why it takes so long.
Legal and insurance issues
- Your homeowner’s insurance may require proof of professional installation or may exclude damage caused by DIY work.
- Some jurisdictions do not allow homeowners to perform certain electrical work without a license.
- If a DIY installation causes a fire or injury, liability questions can get complicated.
Before starting a DIY project, it’s wise to speak with your local building department and your insurance company about what is and isn’t allowed or covered.
When DIY Solar Can Make Sense
Good candidates for DIY solar
DIY solar can be reasonable in certain situations, especially when the project is smaller and simpler. You may be a good candidate if:
- You’re installing a small off-grid system (cabin, RV, shed, boat) not connected to the utility grid.
- You have strong electrical and construction experience (for example, you’re an electrician, engineer, or experienced contractor).
- Your project is a ground-mounted system on your property, where roof leaks aren’t a concern.
- Your local jurisdiction allows homeowner electrical work and has clear DIY-friendly processes.
- You’re comfortable reading electrical diagrams and local code requirements.
Situations where partial DIY can work
Some homeowners choose a hybrid approach to balance savings and safety:
- You install the racking and panels under guidance, and hire a licensed electrician for wiring and interconnection.
- You handle trenching, conduit runs, or site prep to reduce labor hours.
- You purchase equipment yourself, but pay a professional for final installation and sign-off.
This can reduce costs while still giving you professional oversight on the most critical parts of the system.
When DIY works in your favor
- You have ample time and patience to learn, plan, and coordinate with inspectors and your utility.
- You’re comfortable accepting responsibility for long-term maintenance and troubleshooting.
- You’re okay if the project takes months instead of weeks.
- You value the learning experience as much as the financial savings.
When Professional Solar Installation Is the Better Choice
Most typical homeowners are better off with a pro
For a standard grid-tied, roof-mounted system on a primary residence, professional installation is usually the safer and more practical choice. It’s especially recommended if:
- You have no electrical or roofing experience.
- Your roof is steep, high, or complex (multiple levels, dormers, skylights).
- You live in an area with strict building codes or complex permitting.
- You want strong warranties and long-term support.
- You’re relying on solar for predictable, long-term savings.
What professional installers handle for you
A reputable installer typically provides:
- Site evaluation and custom system design
- Permit applications and plan sets
- Structural and electrical engineering (if required)
- Roof mounting, wiring, and equipment installation
- Inspections and utility interconnection paperwork
- Monitoring setup and system walkthrough
Understanding this process can help you know what to expect; the site’s guide on what to expect on solar installation day walks through a typical timeline.
When professional installation works in your favor
- Time savings: Most residential installs are completed in 1–3 days once permits are approved.
- Risk transfer: Design errors, roof leaks, and code issues are the installer’s responsibility, not yours.
- Better financing options: Many installers offer loans or payment plans that DIY suppliers do not.
- Resale value: Professionally installed, permitted systems are easier to document and may be more attractive to buyers.
How to choose the right installer
Not all installers are equal. It’s important to compare:
- Licensing, insurance, and years in business
- Equipment brands and warranties offered
- Workmanship warranty length (often 10–25 years)
- Local reviews and references
- Clarity and transparency of the quote
For a step-by-step checklist, see the guide on how to choose a solar installer and what to avoid.
Key Numbers: Costs, Savings, and Payback
Average system size and lifespan
- Typical system size: 6–10 kW for many U.S. homes
- Average number of panels: 15–25 panels, depending on panel wattage
- Panel performance warranty: 25–30 years
- Typical useful life: 30–35 years before output drops significantly
Whether you go DIY or professional, these lifespan numbers are similar if you use quality equipment and install it correctly.
Costs and incentives (professional baseline)
National averages for professionally installed residential solar:
- Cost per watt: $2.50–$3.50
- Total system cost: $28,000–$32,000 before incentives for many homes
- Federal Investment Tax Credit (ITC): 30% of eligible system costs through 2032
- Net cost after 30% ITC: roughly $19,600–$22,400, if you qualify
State and local incentives can further reduce costs, but they vary widely. For details on available incentives and how they work, review the site’s solar incentives and tax credits guide. Always consult a tax professional for advice on your specific situation.
Typical savings and payback
- Average annual electric bill savings: $1,300–$1,500 nationally
- Typical payback period: 7–9 years on average
- Total savings over 25–30 years: often tens of thousands of dollars, depending on local rates and rate increases
DIY vs. professional installation doesn’t change how much energy your roof receives, but it can affect:
- System performance (if DIY design is suboptimal)
- Downtime from troubleshooting or failed components
- Out-of-pocket repair costs if something goes wrong
Individual results vary based on your utility rates, roof orientation, shading, and how much electricity you use. For a broader perspective on whether solar is a good fit, see the site’s honest “Is solar worth it?” guide.
How DIY impacts the numbers
If a DIY project goes smoothly, you might:
- Reduce your upfront cost by $8,000–$15,000 compared to a professional install.
- Shorten your payback period by a few years, assuming similar performance.
However, if DIY leads to lower production, frequent issues, or major repairs, the long-term savings can shrink or even disappear. The financial upside is real, but so is the downside risk.
Permits, Codes, and Utility Approval: Why DIY Gets Complicated
Permits you’ll likely need
Most grid-tied residential solar projects require:
- Electrical permit for wiring, breakers, and interconnection
- Building or structural permit for roof loading and mounting
- Sometimes a planning or zoning review, especially in historic districts or HOAs
Professional installers usually handle this paperwork. As a DIYer, you’ll need to prepare plan sets, equipment lists, and sometimes structural calculations yourself or hire an engineer.
Code requirements
Solar installations must comply with:
- The National Electrical Code (NEC), including solar-specific articles
- Local amendments and building codes
- Fire code requirements for roof access and pathways
These codes are updated regularly, and inspectors expect current standards. Learning and applying them correctly is a significant part of a DIY project.
Utility interconnection rules
Each utility has its own process and requirements, which may include:
- Application forms and fees
- System size limits or special rules for larger systems
- Approved equipment lists
- Net metering or export credit rules
Some utilities are more DIY-friendly than others. In some areas, they may insist on a licensed electrician’s sign-off before granting Permission to Operate.
When this works against DIY
- If your utility or city is not used to DIY solar, you may face more scrutiny and delays.
- If you’re unfamiliar with plan sets and code language, the learning curve can be steep.
- Multiple rounds of corrections can add weeks or months to your project timeline.
Roof, Structure, and Safety Considerations
Is your roof ready for solar?
Before any solar installation — DIY or professional — you need to know:
- Roof age and condition: If your roof is near the end of its life, it’s often better to replace it first.
- Roof type: Asphalt shingle is easiest; tile, metal, and flat roofs require different mounting methods.
- Structural capacity: Solar adds weight; older or undersized framing may need reinforcement.
Professionals often include a roof assessment and may coordinate with roofers if needed. As a DIYer, you’ll need to arrange this yourself and understand the implications.
Working at height and fall protection
Roof work is inherently risky. Safe installation requires:
- Proper ladders and secure ladder setup
- Fall protection (harnesses, anchors, lifelines)
- Comfort working on sloped surfaces in varying weather
Professional crews are trained and equipped for this. If you’re not experienced with roof work, this is a serious safety consideration.
When roof and structure issues favor professional installation
- Steep or multi-story roofs increase fall risk.
- Complex roof layouts require careful design to avoid shading and maintain access.
- Structural concerns may require an engineer and specialized mounting hardware.
In these cases, the added risk and complexity make DIY far less attractive.
Warranties, Insurance, and Long-Term Support
Equipment warranties
Solar panels and inverters typically come with:
- Panel product warranty: 10–25 years against defects
- Panel performance warranty: 25–30 years guaranteeing a certain output level
- Inverter warranty: 10–25 years, depending on type and brand
Some manufacturers require installation by an approved or licensed installer to maintain full warranty coverage. DIY installation may limit your options or reduce warranty support.
Workmanship warranties
Professional installers usually offer a workmanship warranty (often 10–25 years) covering:
- Roof penetrations and leaks caused by the installation
- Wiring and connections they installed
- Racking and mounting issues
With DIY, there is no workmanship warranty — you are responsible for any problems that arise from the installation.
Homeowner’s insurance considerations
- Many insurers cover professionally installed solar as part of the dwelling.
- They may ask for permits, inspection sign-offs, or proof of professional installation.
- DIY work that causes damage may not be covered, depending on your policy.
It’s important to speak with your insurance provider before starting a DIY project to understand how it affects your coverage.
Long-term maintenance and troubleshooting
Over 25–30 years, you may encounter:
- Inverter replacements or failures
- Monitoring issues
- Roof repairs requiring panel removal and reinstallation
With a professional installation, you typically have a single point of contact for service. With DIY, you’ll either handle issues yourself or hire help as needed. For ongoing care, the site’s solar maintenance and troubleshooting guide can be a useful reference.
Decision Guide: Should You DIY or Hire a Pro?
Key questions to ask yourself
Use these questions to quickly gauge which path fits you better:
- Comfort with risk: Are you okay taking responsibility for electrical safety, roof integrity, and code compliance?
- Skills and experience: Have you done significant electrical or roofing work before?
- Time available: Can you realistically dedicate many evenings and weekends over several months?
- Local rules: Does your city and utility allow and support homeowner-installed solar?
- Budget vs. peace of mind: Is saving $8,000–$15,000 worth the added risk and effort to you?
When DIY solar is likely worth considering
DIY may be worth serious consideration if:
- You’re installing a small, off-grid, or ground-mounted system.
- You have strong technical skills and are comfortable with electrical codes.
- Your jurisdiction and utility are known to be DIY-friendly.
- You’re motivated by the learning experience and are patient with delays.
When professional installation is almost always the better choice
Professional installation is usually the right move if:
- You want a standard, grid-tied, roof-mounted system on your primary home.
- You have limited time and no desire to manage permits and inspections.
- You value warranties, support, and predictable performance.
- Your roof is complex or your local codes are strict.
What to do before getting quotes
Whether you’re leaning DIY or professional, it helps to:
- Gather your last 12 months of electric bills to understand your usage.
- Note your roof age, type, and any known issues.
- Check your main electrical panel size (e.g., 100A, 150A, 200A).
- Look up basic solar incentives in your state.
When you’re ready to talk to installers, getting multiple quotes is smart. It helps you compare pricing, equipment, and design — and even if you still consider DIY, those designs can inform your own planning.
Frequently Asked Questions
Can I legally install my own solar panels?
In many areas, homeowners are allowed to install their own solar panels, but you must still follow building and electrical codes and obtain permits and inspections. Some jurisdictions restrict certain electrical work to licensed professionals, and many utilities require a licensed electrician’s sign-off for grid connection. Always check with your local building department and utility before starting a DIY project.
Will I still get the 30% federal tax credit if I do DIY solar?
The federal solar tax credit (ITC) is generally based on eligible system costs, not on who installs the system, so DIY projects can potentially qualify. However, you must meet all IRS requirements, keep detailed records, and file the correct forms, and your situation may be different if you cut corners or use non-permitted work. Always consult a qualified tax professional to confirm your eligibility.
How much can I really save with DIY solar?
For a typical 6–10 kW home system, DIY installation might save you roughly $8,000–$15,000 compared to a professional install, mainly by avoiding labor and overhead costs. However, extra expenses for tools, engineering, rework, and potential mistakes can reduce those savings. The more complex your roof, permits, and utility requirements, the less predictable the savings become.
Is DIY solar more likely to fail or have problems?
DIY systems can perform just as well as professionally installed ones if they are designed and installed correctly with quality components. In practice, most failures and issues in DIY projects come from design errors, improper wiring, or roof mounting mistakes. Professional installers reduce this risk through experience, standardized processes, and inspections, and they typically back their work with warranties.
Can I do part of the solar installation myself and hire a pro for the rest?
Yes, a hybrid approach is possible and common in some areas. You might handle tasks like mounting racking or trenching while hiring a licensed electrician or solar installer for wiring, interconnection, and final inspections. Be sure to coordinate this upfront with any professional you hire so responsibilities, warranties, and pricing are clear.
How long does a DIY solar project usually take?
A DIY solar project can take several weeks to several months, depending on your experience, permit timelines, and how much time you can dedicate. Professional installations often complete the physical work in 1–3 days once permits are approved, with the overall process typically taking a few weeks. If you need your system running quickly, DIY may not be the best option.
Summary: DIY vs. Pro Solar Installation
- DIY solar can reduce upfront costs by roughly $8,000–$15,000 on a typical home system, but it shifts design, safety, and code-compliance risk onto you.
- Professionally installed systems typically cost $28,000–$32,000 before incentives and $19,600–$22,400 after the 30% federal tax credit, with average payback in 7–9 years.
- DIY is most realistic for small, off-grid, or ground-mounted projects and for homeowners with strong electrical and construction skills.
- For standard grid-tied, roof-mounted systems, professional installation usually offers better safety, warranties, and long-term peace of mind.
- The best next step is to understand your usage, roof, and local incentives, then compare multiple professional quotes — even if you’re still considering DIY.
What to Do Next
Solar is a long-term investment, and the right choice between DIY solar and professional installation depends on your skills, risk tolerance, and local rules. The most reliable way to see real numbers for your home is to get a few personalized quotes and compare them to any DIY options you’re considering.
If you’re ready to see what professionally installed solar would cost for your roof, you can request no-obligation estimates at /get-my-quote/. Use those quotes as a benchmark so you can make a confident, informed decision about whether DIY solar is truly worth the risk for your situation.