
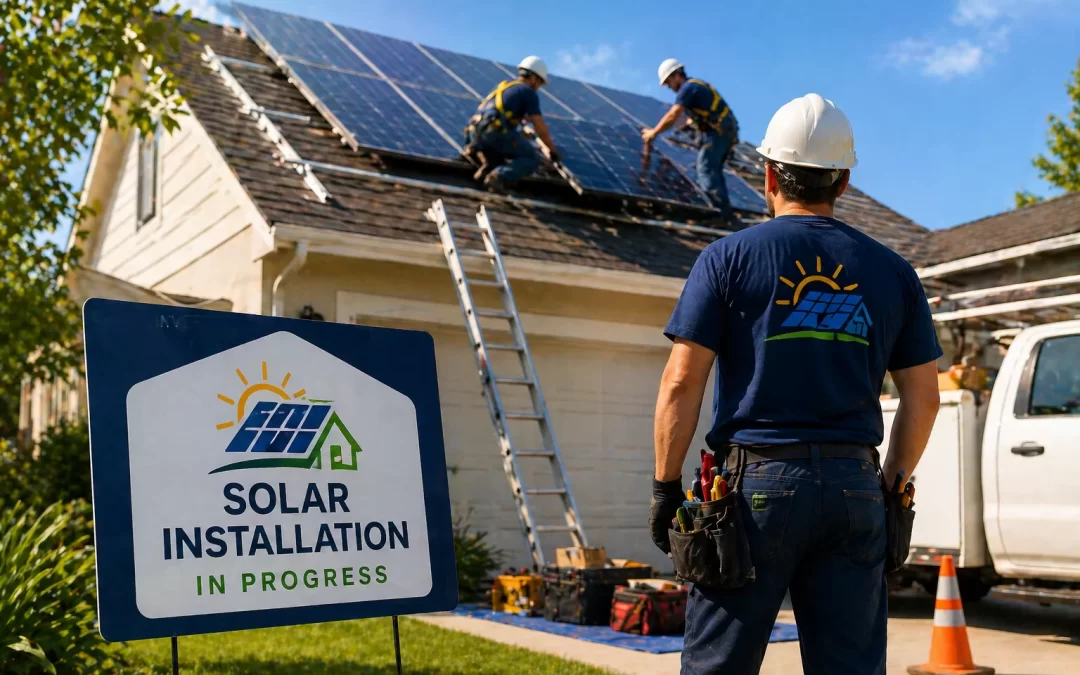
On solar installation day, you can expect a crew of 3–6 installers to arrive in the morning, set up safety equipment, mount rails and panels on your roof, run wiring, and connect the system to your electrical panel. Most residential solar installations take one full day, though larger or more complex systems can spill into a second day. Your power may be briefly shut off while they make electrical connections, but you’ll usually have electricity for most of the day. The system typically won’t be turned on right away — you’ll still need inspections and “permission to operate” from your utility before it starts producing power.
Solar installation day is when your project finally becomes real — panels go on the roof, wiring is run, and your home starts to look “solar.” This guide is for U.S. homeowners who want to know exactly what will happen, how long it takes, and what you need to do. We’ll walk through the schedule, who shows up, what can go wrong, and how to tell if your installer is doing quality work.
Table of Contents
- What to Expect on Solar Installation Day (Step by Step)
- Who Will Be at Your Home and What They Do
- How Long Solar Installation Day Really Takes
- Key Numbers: Costs, Savings, and System Size
- How to Prepare Your Home for Solar Installation Day
- What Can Go Wrong on Installation Day (and How to Handle It)
- What Happens After Installation Day?
- Is Now the Right Time for You to Install Solar?
- Frequently Asked Questions
- Summary: Key Takeaways
What to Expect on Solar Installation Day (Step by Step)
Simple overview of solar installation day
For most homeowners, solar installation day is:
- One full workday (often 8 a.m. to 4–5 p.m.)
- A crew of several installers working on your roof and around your electrical panel
- Some noise (drilling, footsteps on the roof, tools) but usually less than a major remodel
- Minimal disruption inside your home, except near the electrical panel and where equipment is mounted
The goal of the day is to get all physical equipment installed and wired so your system is ready for inspection and utility approval.
Typical step-by-step schedule
Every installer is a bit different, but a common schedule looks like this:
- Arrival and walkthrough (30–45 minutes)
- Lead installer introduces the crew and confirms the plan with you
- They review where panels, inverters, and conduit will go
- You confirm locations for any visible equipment on exterior walls or in the garage
- Safety setup (30–60 minutes)
- Ladders, roof anchors, and fall protection installed
- Work areas marked off; tools and materials staged
- Power tools and generators (if needed) set up
- Roof work: rails and flashing (2–4 hours)
- Flashing (waterproof mounts) installed under shingles or roof material
- Aluminum rails attached to the mounts
- Roof penetrations sealed to prevent leaks
- Electrical work (2–4 hours, often in parallel)
- Inverter(s) and disconnect switches mounted
- Conduit and wiring run from roof to inverter and to your electrical panel
- Brief power shutoff while they connect to your panel or subpanel
- Panel installation (1–3 hours)
- Solar panels attached to rails and wired together
- Microinverters or optimizers (if used) connected
- System grounded for safety
- Testing and labeling (1–2 hours)
- System tested for correct wiring and voltage (often without turning it “on” to the grid)
- Warning labels and placards installed per code
- Photos taken for permits, inspections, and your records
- Final walkthrough (15–30 minutes)
- Installer shows you the equipment and shutoff switches
- They explain what happens next (inspections, utility approval)
- You sign any completion paperwork
What affects how your installation day goes
Your experience on solar installation day can vary based on:
- Roof type – Asphalt shingle roofs are fastest; tile, metal, or flat roofs usually take longer.
- System size – A 15-panel system is quicker than a 30-panel system.
- Electrical upgrades – If your main panel needs work or you need a new subpanel, expect more time and possibly a second day.
- Weather – Rain, snow, or high winds can slow or pause roof work.
- Installer quality and crew size – A well-organized crew of 5 can finish in a day what a small or inexperienced crew might stretch to two.
When installation day usually goes smoothly
You’re more likely to have a smooth, one-day installation if:
- Your roof is relatively simple (few levels, minimal shading, standard asphalt shingles).
- Your electrical panel has enough capacity and space for a solar breaker.
- Your installer did a thorough site survey and addressed roof or electrical issues in advance.
- The weather is dry with moderate temperatures.
When installation day can be bumpy
Solar installation day can be more complicated if:
- The crew discovers hidden roof damage or rot that must be fixed before mounting hardware.
- Your roof is very steep, high, or complex, requiring extra safety measures and time.
- Your main electrical panel is older, crowded, or not up to code, requiring upgrades.
- There are HOA, historic district, or local code requirements that change equipment locations.
These issues don’t mean solar is a bad idea, but they can add time and cost. A good installer will explain options clearly and not pressure you into unsafe shortcuts.
Who Will Be at Your Home and What They Do
The typical installation crew
On solar installation day, you’ll usually see:
- Lead installer or project manager – Your main point of contact on-site; oversees quality and safety.
- Roof crew (2–4 people) – Installs mounts, rails, and panels on the roof.
- Electrician or electrical specialist – Handles wiring, panel connections, and code compliance.
- Occasional inspector or supervisor – For larger companies, a quality-control person may stop by.
What they should do before starting work
A professional crew should:
- Confirm your name, address, and system design.
- Walk you through where everything will go and answer questions.
- Ask about pets, kids, and any areas of the home they should avoid.
- Explain when they’ll need to shut off power and for how long.
Signs of a professional vs. sloppy installer
Positive signs include:
- Clean, organized work area and respectful behavior.
- Use of fall protection and safety gear on the roof.
- Conduit runs that are straight, neatly attached, and painted (if promised).
- Clear labeling on electrical equipment and shutoff switches.
Red flags include:
- No clear leader or point of contact on-site.
- Roof work without visible safety measures.
- Messy conduit runs or equipment placed where you didn’t agree.
- Unwillingness to answer reasonable questions about the work.
If you’re still choosing a company, our guide on how to choose a solar installer explains what to look for and what to avoid before you sign a contract.
How Long Solar Installation Day Really Takes
Typical installation time by system type
Most U.S. homes fall into these ranges:
- Small system (10–15 panels) – 4–6 hours
- Average system (15–25 panels) – 6–8 hours (one full day)
- Large system (25–35+ panels) – 1–2 days
- System with battery storage – Often 1.5–2 days due to extra wiring and equipment
These are averages; your actual time depends on roof complexity, crew size, and electrical work needed.
Why installation day is only part of the total timeline
Solar installation day is just one step in the full process. From contract to turn-on, it often takes 6–12 weeks because of:
- Permitting with your city or county
- Utility interconnection applications
- Scheduling inspections
- Waiting for “permission to operate” (PTO) from your utility
For a full overview of the entire process, see our detailed guide on how long solar installation takes from start to finish.
When installation takes longer than a day
Your installation may stretch into a second day if:
- Weather delays roof work partway through the day.
- The crew discovers roof or structural issues that must be addressed.
- Significant electrical upgrades are needed (new main panel, service upgrade).
- You’re adding batteries, EV chargers, or other extras.
In these cases, a reputable installer will explain the delay, give you a revised schedule, and make sure your home is safe and watertight before leaving for the day.
Key Numbers: Costs, Savings, and System Size
Typical system size and equipment on installation day
For a typical U.S. home, you can expect:
- Average panels needed – About 15–25 panels, depending on your energy use and roof space.
- Panel lifespan – Most panels come with a 25–30 year performance warranty and often last 30–35 years in real-world use.
- Inverter type – Either a single “string” inverter, multiple string inverters, or microinverters/optimizers mounted under each panel.
The crew will bring all mounting hardware, wiring, and safety equipment needed to complete the job based on your signed design.
What solar systems cost (and how installation day fits in)
As of 2026, national averages for residential solar are:
- Cost per watt – About $2.50–$3.50 per watt before incentives.
- Average system cost – Around $28,000–$32,000 before incentives for a typical home.
- After 30% federal tax credit (ITC) – Net cost often around $19,600–$22,400, if you qualify and can use the credit.
Installation day labor and materials are already built into your contract price — you’re not paying separately for that day. The 30% federal solar tax credit (currently available through 2032) applies to the full installed cost, including labor, but you should confirm details with a tax professional and review our solar incentives and tax credits guide for how it generally works.
Typical savings and payback period
On average, U.S. homeowners see:
- Average annual savings – About $1,300–$1,500 on electricity bills, depending on rates and system size.
- Payback period – Roughly 7–9 years nationally, after which your power is effectively much cheaper for the remaining life of the system.
Your actual savings depend heavily on your local utility rates, how much sun your roof gets, and whether you have net metering or similar programs. Our solar cost and savings guide breaks down how to estimate your personal numbers.
When the numbers work in your favor
Solar is more likely to be financially attractive if:
- Your electric bill is consistently high (often $120+/month).
- You live in a state with strong sun and decent net metering or bill credit programs.
- You plan to stay in your home at least 7–10 years.
- You can use the 30% federal tax credit (confirm with a tax professional).
When solar may not be a good fit
Solar might not make sense right now if:
- Your roof is heavily shaded most of the day.
- You expect to move in the next 2–3 years and your local market doesn’t value solar highly.
- Your roof needs replacement soon and you’re not ready to address it yet.
- Your electric bills are already very low, so savings would be modest.
If you’re unsure, our honest overview on whether solar is worth it walks through when it does and doesn’t make sense.
How to Prepare Your Home for Solar Installation Day
Simple steps to take before the crew arrives
A little preparation can make installation day smoother and safer:
- Clear driveway and access areas – Move cars so the crew can park close and set up ladders.
- Unlock gates – Ensure access to the backyard, side yards, and any roof access points.
- Secure pets – Keep dogs and other pets indoors or in a safe area away from workers and open gates.
- Clear around the electrical panel – Make sure there’s at least 3 feet of clear space in front of your main panel.
- Protect delicate items – If you have items on walls or shelves that might rattle from roof work, consider taking them down.
What you should confirm with your installer beforehand
Before installation day, it’s wise to confirm:
- Arrival time and expected duration.
- Where equipment (inverters, disconnects, conduit) will be mounted.
- Whether someone over 18 needs to be home all day or just at the start and end.
- Any special instructions for your home (alarm systems, gate codes, parking rules).
Roof condition and timing
If your roof is older or in questionable condition, it’s important to address that before installation day. Putting new solar on a roof that needs replacement soon can cost you more later because the panels must be removed and reinstalled. Our guide on whether you need a new roof before solar explains how to evaluate your roof and timing.
What Can Go Wrong on Installation Day (and How to Handle It)
Common issues that may come up
Even with good planning, a few things can go off-script:
- Hidden roof damage – Rot, soft spots, or prior leaks discovered when mounts are installed.
- Electrical surprises – Old or unsafe wiring, undersized service, or panels not up to current code.
- Design changes – Obstructions (vents, chimneys) or shading that require moving or removing some panels.
- Weather delays – Rain or high winds that make roof work unsafe.
How a good installer should respond
Professional installers will:
- Pause work and explain the issue clearly.
- Show you photos or let you see the problem (when safe).
- Offer options, including costs and schedule impacts, before proceeding.
- Never pressure you into unsafe shortcuts just to stay on schedule.
What you can do if something feels off
If you’re uncomfortable with what’s happening:
- Ask the lead installer to walk you through the issue and proposed solution.
- Call your salesperson or project manager at the company for clarification.
- Take your own photos of any areas of concern.
- If necessary, ask them to pause work until you understand and agree on next steps.
It’s your home and your roof — you’re entitled to clear explanations before approving changes.
What Happens After Installation Day?
Immediate next steps
Once the crew leaves, your system is usually installed but not yet turned on. The typical next steps are:
- Final inspection by the city or county – A building or electrical inspector checks that the system meets code.
- Utility approval (Permission to Operate, or PTO) – Your utility reviews the paperwork and gives written approval to turn the system on.
- System activation – Your installer or utility flips the final switch, and your monitoring app is set up.
This process can take anywhere from a few days to several weeks, depending on your local permitting office and utility. For a deeper dive into why PTO can be slow, see our guide on what permission to operate is and why it takes so long.
What you should receive from your installer
After installation day (or at activation), you should get:
- System documentation (equipment manuals, warranties).
- As-built drawings or a diagram of your system.
- Instructions for your monitoring app or web portal.
- Contact information for service or warranty issues.
Ongoing care and maintenance
Solar systems are generally low-maintenance, but you should:
- Check your monitoring app periodically to ensure production looks normal.
- Visually inspect panels from the ground a few times a year for obvious damage or debris.
- Follow your installer’s guidance on cleaning (often rain is enough in many climates).
For more on keeping your system running well, see our solar maintenance and troubleshooting guide.
Is Now the Right Time for You to Install Solar?
Questions to ask yourself before installation day is even scheduled
Before you get to solar installation day, it’s smart to confirm:
- Roof condition – Will your roof last at least 10–15 more years?
- Time in home – Do you plan to stay long enough to see a payback (often 7–9 years)?
- Electric bill level – Are your bills high enough that savings will be meaningful?
- Shading – Does your roof get good sun for most of the day?
Information you should gather before getting quotes
To get accurate quotes and avoid surprises later, have:
- 12 months of electric bills (or at least a few recent ones).
- Basic info about your roof (age, material, any known issues).
- Plans for future changes (EV purchase, heat pump, pool, home addition).
- Photos of your electrical panel and roof (many installers ask for these upfront).
Questions to ask potential installers
When you talk to installers, ask:
- How many installations they’ve done in your area and with your roof type.
- Whether they use in-house crews or subcontractors.
- What happens if they find roof or electrical issues on installation day.
- Who handles permits, inspections, and utility paperwork.
- What their workmanship warranty covers and for how long.
Getting multiple quotes is almost always a good idea. It helps you compare pricing, equipment, and installation practices so you’re more confident when installation day arrives.
Frequently Asked Questions
Do I need to be home on solar installation day?
You should be home at least at the beginning and end of solar installation day to review the plan, answer questions, and do the final walkthrough. Some installers require an adult to be present all day, especially when they need access inside the home. Confirm your installer’s policy ahead of time so there are no delays.
Will I lose power during the solar installation?
Yes, your power will usually be turned off briefly while the electrician connects the solar system to your electrical panel. This outage typically lasts from 15 minutes to an hour, and you’ll be told before it happens. For most of the day, your power will be on as usual.
Is solar installation noisy or disruptive?
You can expect some noise from drilling, hammering, and workers walking on the roof, similar to a light roofing or construction project. Most of the activity is outside, so disruption inside the home is usually limited to brief work near your electrical panel. If you work from home, you may want headphones or to plan calls away from the noisiest times.
Will my roof leak after solar panels are installed?
A properly installed solar system should not cause roof leaks because installers use flashing and sealants designed to keep water out. Most reputable installers also provide a workmanship warranty that covers roof penetrations for a set number of years. If your roof is already in poor condition, it’s important to address that before installation to reduce leak risk.
Can solar panels be installed in one day?
Yes, many residential solar systems are fully installed in a single day, especially average-sized systems on simple asphalt shingle roofs. Larger systems, complex roofs, or projects with batteries and electrical upgrades often take two days or more. Your installer should give you a realistic time estimate based on your specific design.
Is it safe to be in the house during solar installation?
Yes, it’s generally safe to be inside your home during solar installation as long as you stay clear of active work areas and follow the crew’s safety instructions. The main risks are outside near ladders, tools, and electrical work. Keep children and pets away from the work zone to avoid accidents.
Summary: Key Takeaways
- On solar installation day, a crew of 3–6 people will mount panels, run wiring, and connect your system, usually in one full workday.
- Most systems cost around $28,000–$32,000 before incentives (about $19,600–$22,400 after the 30% federal tax credit if you qualify) and pay back in roughly 7–9 years on average.
- Your experience depends heavily on roof type, system size, electrical condition, weather, and installer quality.
- You’ll likely need inspections and utility “permission to operate” after installation day before your system can be turned on.
- The best next step is to gather your electric bills, roof info, and questions, then get multiple quotes from reputable installers to see if solar is a good fit for your home.
If you’re close to a decision, the most reliable way to know what to expect on your own solar installation day is to get personalized quotes based on your roof, utility, and energy use. When you’re ready, you can compare offers and timelines from vetted installers by visiting our quote request page — no pressure, just clear information to help you decide.